Friday 25 May 2012
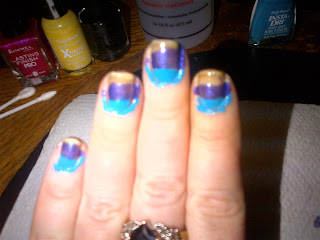
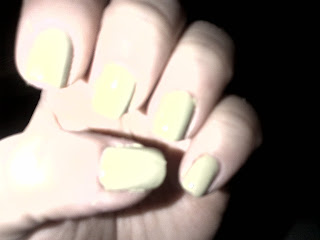
So here is something I had been waiting to try for awhile. a tap mani. So what you do is, take some basic scotch tape and put it over half your nail. Paint, with a color of your choice the nail without the tape. let it dry Then when you think that it is dry, wait another 5 mins....lol....Super important that it is dry. Take the tape of and paint, with another color the rest of your nail. I really like the way this turned out. This is mine uncleaned and without a topcoat. A good friend of mine, told me a good trick, she has scissors with different ridges. So she uses them and instead n of having just a basic straight lin separating the two polishes, you can have a swiggly line and many others. My next purchases is a set of those scissors. Have any of you tried this out yet? share you manis and tips with me:)
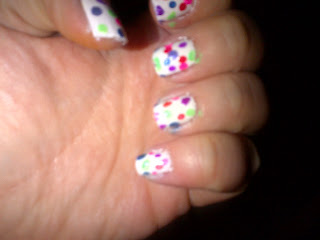
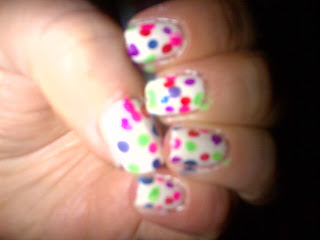
So here is something most of you have probably seen, at least once, but in many different ways. Since I got my dotting tools, I had yet to really use them so decided to do a polka dot mani. First, I painted my nails white and then I took the dotting tool and a bunch of colors I liked and , well, just got to it. SOme people, will use different shapes, or make them all the same pattern on every nail. Being my first time, I wanted to have fun, so I just used same shape for all and used my fav colors. I like the way this turned out, but next time, I will certainly be more precise and stick to a pattern But for now, take a look at this:)
Tools I used:) many different sizes but I used the second biggest dot for this. you can find these on ebay for 3$ and less. definitely worth it!
as you can see its a really cute mani and if you do it as i did, without a pattern and whatnot its super aesy. just paint your nails white, then choose some colors. first colors you are using, make a few dots on each nail. then go to next color and do your nails and so on:)
TIP: if you do not have these dotting tools, you can use toothpicks and bobby pins. and if you wnat to make bigger dots then what the toothpick or pin offers, add nail polish (dip it into the polish) let it dry and once it is dry and hard, add another layer. The more layers you add, the bigger the dot will be.
HAve any of you guys tried this mani out yet?? What are your tips/tricks??
Tools I used:) many different sizes but I used the second biggest dot for this. you can find these on ebay for 3$ and less. definitely worth it!
 |
| As you can see here, its 5 pieces but each end has a dot so you get 10 different size dots . |
On to the mani
TIP: if you do not have these dotting tools, you can use toothpicks and bobby pins. and if you wnat to make bigger dots then what the toothpick or pin offers, add nail polish (dip it into the polish) let it dry and once it is dry and hard, add another layer. The more layers you add, the bigger the dot will be.
HAve any of you guys tried this mani out yet?? What are your tips/tricks??
Wednesday 23 May 2012
I LOVE sharing giveaways with my followers! Good luck to all and let me know if you win! I have yet to win a giveaway but I keep trying:):) http://livingwhileloving.blogspot.ca/2012/05/my-first-giveaway.html
Saturday 19 May 2012
Another great blog with another great giveaway:) http://www.dragonladynails.com/2012/04/750-follower-appreciation-giveaway.html
Heres all the details
Link: http://tinyurl.com/89gp2n7
Heres all the details
Link: http://tinyurl.com/89gp2n7
heres an awesome giveaway, good luck all:) go to her page and find the awesome giveaway http://t.co/IzS5GfIS
Friday 18 May 2012
Hey fellow polish lovers, hers a giveaway. Good luck!!http://polished-paradise-nails.blogspot.ca/2012/05/300-fan-giveaway.html
Wednesday 16 May 2012
heres a giveaway. Good luck all:)
http://www.thenailjunkie.com/2012/05/hole-hearted-giveaway-open.html
http://www.thenailjunkie.com/2012/05/hole-hearted-giveaway-open.html
Thursday 10 May 2012
GIVEAWAYS ARE SO FUN!!!! HEres another one my fellow nail polish lovers:)
http://www.facebook.com/krystal.kesson/posts/288459534580092
http://www.facebook.com/krystal.kesson/posts/288459534580092
Wednesday 9 May 2012
HEre is another giveaway. good luck all. also check out her site. It is pretty and cool:)
http://www.glitterobsession.com/2012/05/giveaway-time.html?showComment=1336626681629#c2405689444876044508
http://www.glitterobsession.com/2012/05/giveaway-time.html?showComment=1336626681629#c2405689444876044508
Thursday 3 May 2012
So heres a quick mani I wanted to show you. My friend did it with my polishes and I loved it. Does that ever happen to you? Your friends will come over and use your nail polishes and make a great mani. Mix colours you would never have thought of. It happens to me all the time:) For this she used Sally Hansen "Set the stage" and a gold OPI. For some reason, the bottom of my bottle has no sticker and so therefore no name, but it is a light gold.
SO here is a fun manicure! I LOVE the way this turned out:) for starters these are the colors I used, Minus the yellow. I was going to use it, but decided not to. Would have been too much, I think:)
So first step, I added a base coat, then, now I didnt, but I would strongly recommend adding tape around your nails. Same as you do when water marbling, to save you from a messy clean-up. Next take your first color and make a horizontal line on each nail. the first one will be starting from the cuticle. They dont need to be too thin but keep in mind you will be adding more lines, depending on how many colors you want, so they will all have to fit. WIll look like this.
Before I say anything else, dont mind my nails. I just had a black and orange on and my nails are stained. But you can see why I always have nail plish on. I cant ever get them clean. Even with all my cleaning tools and kits. I even bought a buffing and polishing tools but didnt do much. They do look a lot worse her from my previous mani though. Just saying...
 now I know all manis should finish with a top coat but I kind of regret adding one. I really love the MAtte look and I find that my crackle has a matte look to it. Once I added the top coat, it was way more shiny looking. This and all the next pics have the top coat
So first step, I added a base coat, then, now I didnt, but I would strongly recommend adding tape around your nails. Same as you do when water marbling, to save you from a messy clean-up. Next take your first color and make a horizontal line on each nail. the first one will be starting from the cuticle. They dont need to be too thin but keep in mind you will be adding more lines, depending on how many colors you want, so they will all have to fit. WIll look like this.
Before I say anything else, dont mind my nails. I just had a black and orange on and my nails are stained. But you can see why I always have nail plish on. I cant ever get them clean. Even with all my cleaning tools and kits. I even bought a buffing and polishing tools but didnt do much. They do look a lot worse her from my previous mani though. Just saying...
 |
| So you can see why I suggested using tape. Makes a mess:) if you make thinner lines, you can add more colors. |
Now the last step is up to you. My plan had been to talk a brush and paint on black lines, to kind of give it a leopard print, but I decided to just use my black crackle and it was the same effect, more or less. I think so anyhow:)
 |
| Not yet cleaned |
 |
| The following were a quick clean I did, I Hadn't done the cuticles yet |
 now I know all manis should finish with a top coat but I kind of regret adding one. I really love the MAtte look and I find that my crackle has a matte look to it. Once I added the top coat, it was way more shiny looking. This and all the next pics have the top coat
And Voila! You should try this. I am glad I did. LEt me know if you do and let me see your versions:)
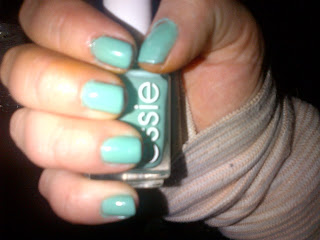
so I am IN LOVE with all the Essie colors that have came out this Spring. Heres a few to show you but I got a lot more on the way:) First up is my favourite. Turquoise and Caicos. I dont take the best pictures. I have tried with my phone and with my camera and cant capture them just right but ....
So this is NOT a Spring color, I know, but I liked the look so I got it. I wasnt disappointed. it is "Licorice" I would describe it as almost black and DARK purple, mixed together. It is really dark.
Navigate her is a lovely light, kind of pastel, green. I would say that after T&C, this is my 2nd fav. Its a great color for Spring. USually greens dont look great with my skin tone but I thought this one suited me fine. A MUST BUY for sure:)
 |
| Dont mind my sore hand:) |
 |
| Add caption |
 |
| Cute as a Button is a nice medium dark pink. This is with two coats. I really like it. |
 |
| two coats. Dont mind the mess please, hadnt yet cleaned it. |
So this is NOT a Spring color, I know, but I liked the look so I got it. I wasnt disappointed. it is "Licorice" I would describe it as almost black and DARK purple, mixed together. It is really dark.
Navigate her is a lovely light, kind of pastel, green. I would say that after T&C, this is my 2nd fav. Its a great color for Spring. USually greens dont look great with my skin tone but I thought this one suited me fine. A MUST BUY for sure:)
STay tuned for more. I HAve a lot more Spring Essie colors coming up:)
heres another awesome giveaway! follow also for great page with lots of ideas:)
http://www.hollyandpolish.com/2012/04/china-glaze-prismatic-collection.html
http://www.hollyandpolish.com/2012/04/china-glaze-prismatic-collection.html
Subscribe to:
Posts (Atom)

