Fast Blinking Hello Kitty

Monday 14 October 2013

"What the Flock" Gold top coat


Evening all,
UGH! OMG!! I am SO FULL!!! it is our Thanksgiving here in Canada today and even though dinner was about 3 hours ago I am still so full. We had a huge turkey dinner with everything you can think of on the side, including my all time fav, stuffing! I still have not had dessert yet because I have not been able to, but pumpkin pie is waiting for me in the fridge. Trust me, as soon as I get a lil bit of room, I will be eating it:) I am so thankful on this day but also everyday for my family and friends that are around with me to enjoy the meal we had and for the fact that I am healthy and lucky enough to enjoy the little things in life, including polish. It's seems so trivial, I know, but for me, it's my hobby and it really does bring me joy and I love taking pictures of what I have done and I am grateful for the few followers I have and so grateful to have found the online nail polish community because I have found so many great friends in the process. So, my blog is more than a year old and I am just happy that I am able to get my hands on new polishes here and there and to be trading and buying from people online and....well... just... happy. Of course ,I am happy with many other things in my life, but, seeing as this is my nail polish blog, I just wanted to express that. And since things have died down here and I don't want to go to sleep just yet, I have a nice glass of wine at my side and wanted to share something with you guys that I actually have had for a lil bit.
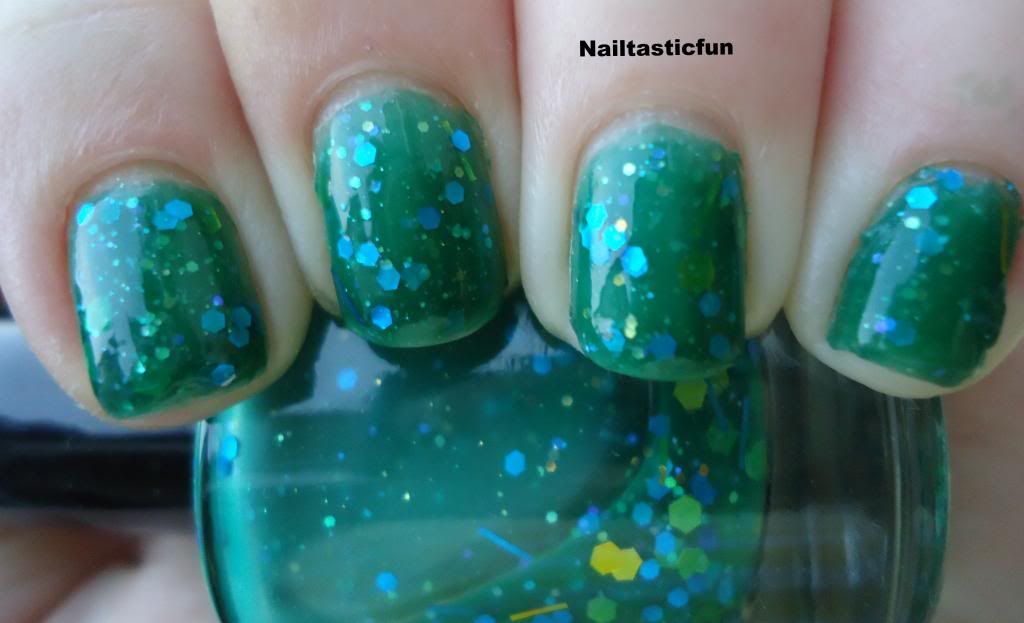
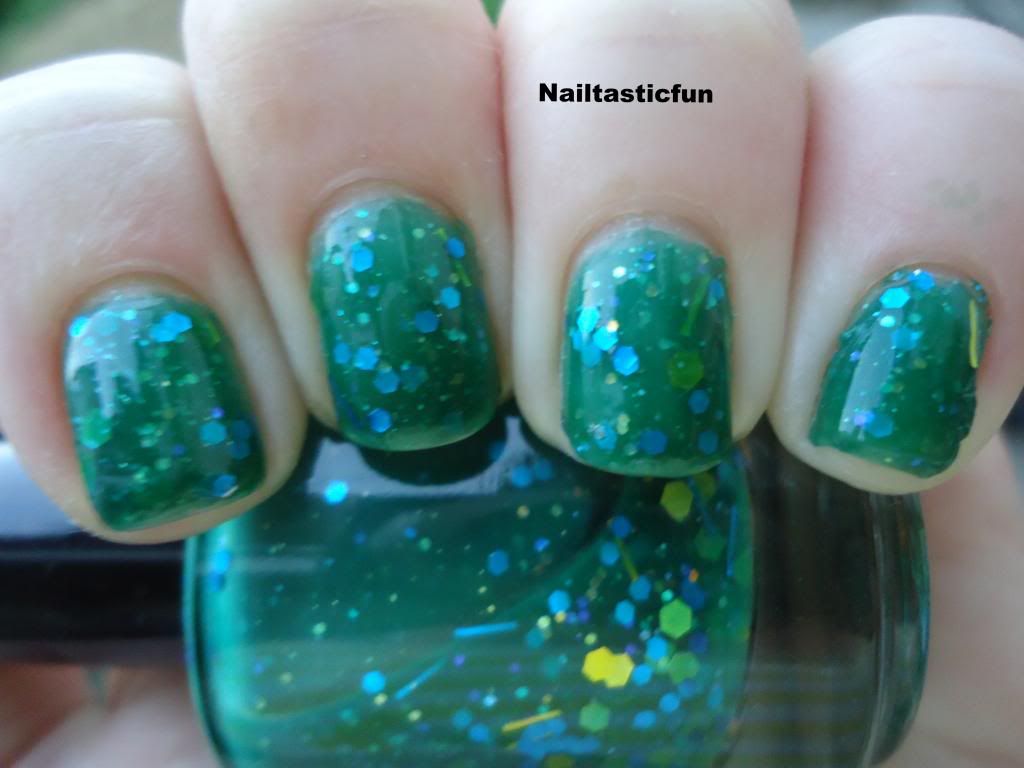
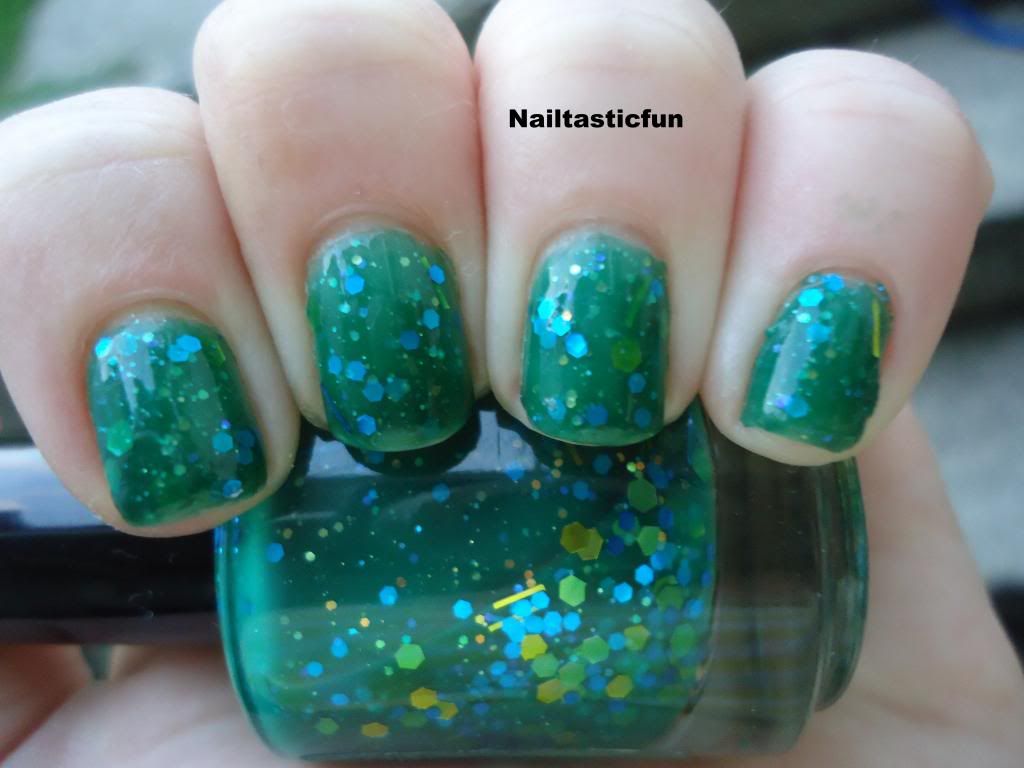
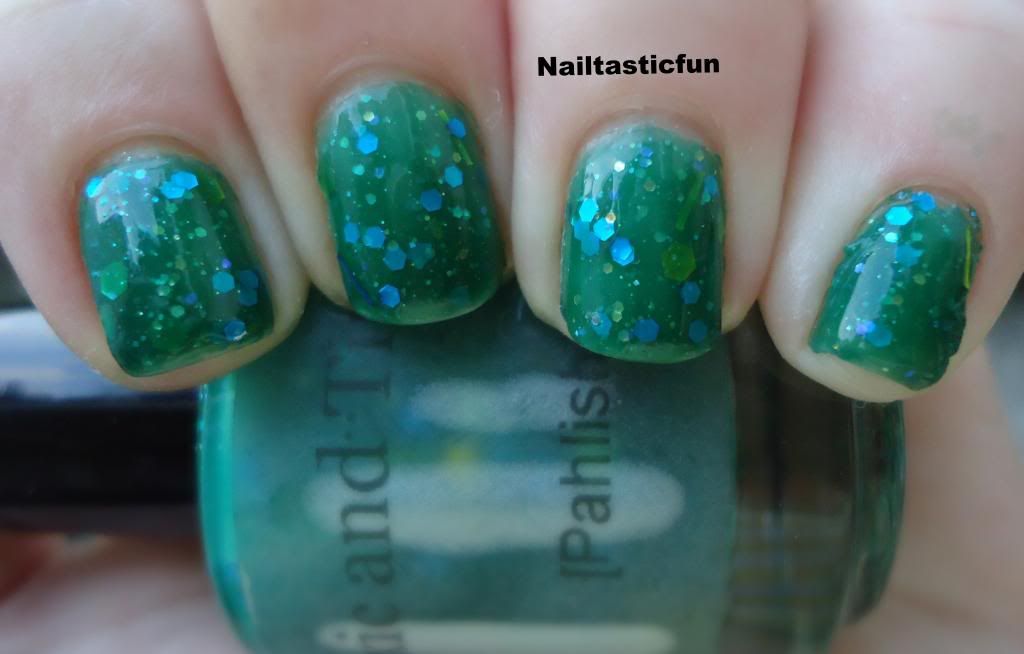
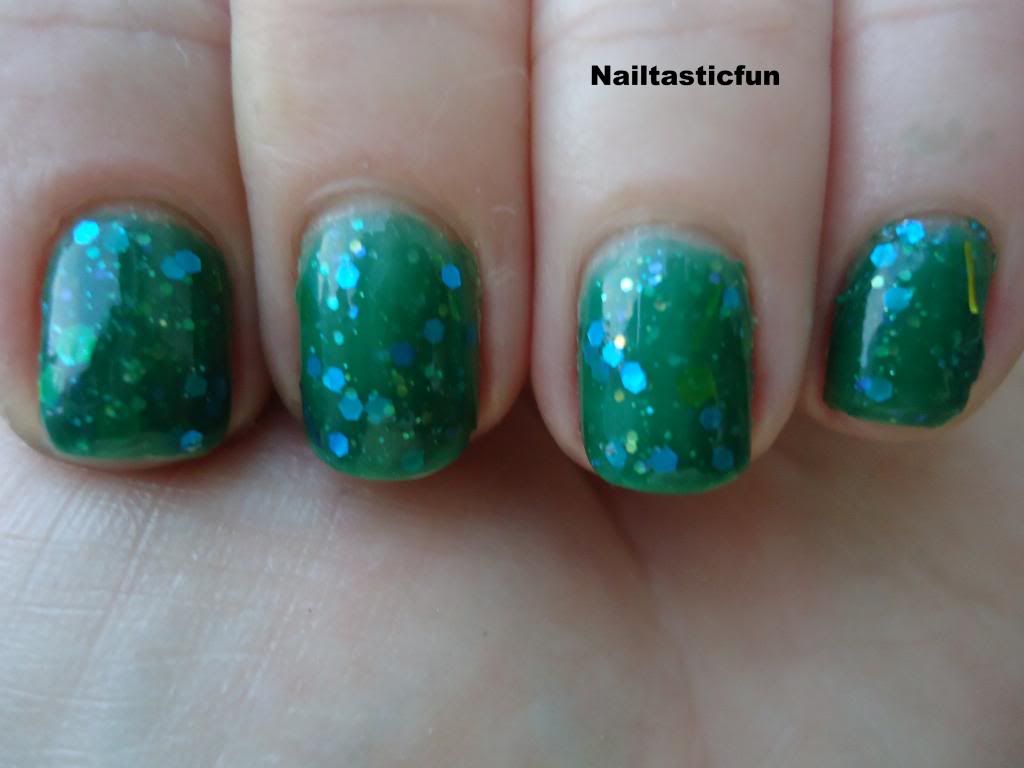
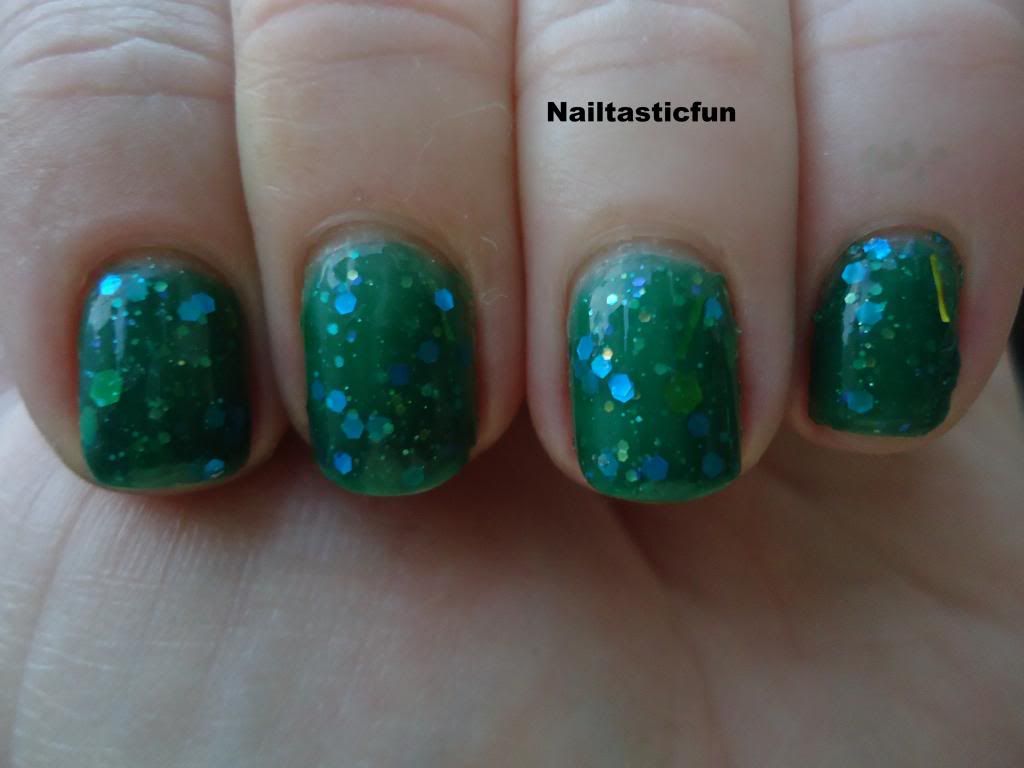
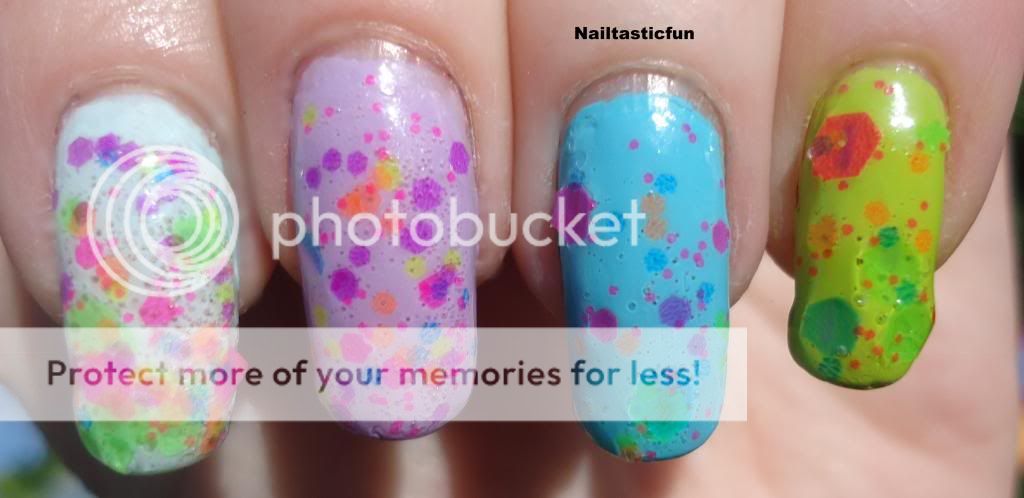
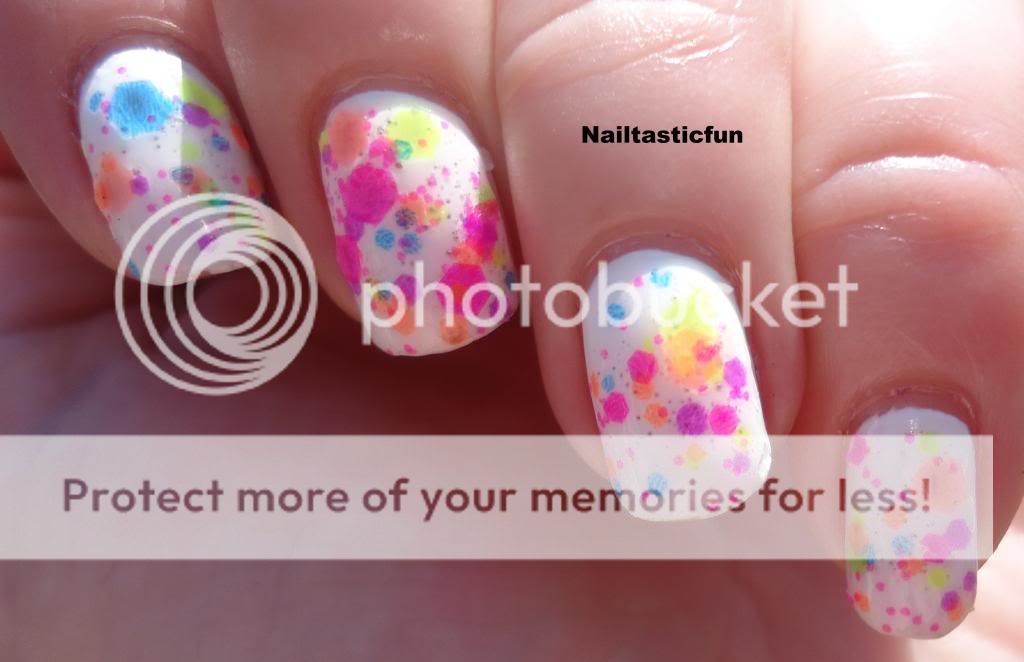
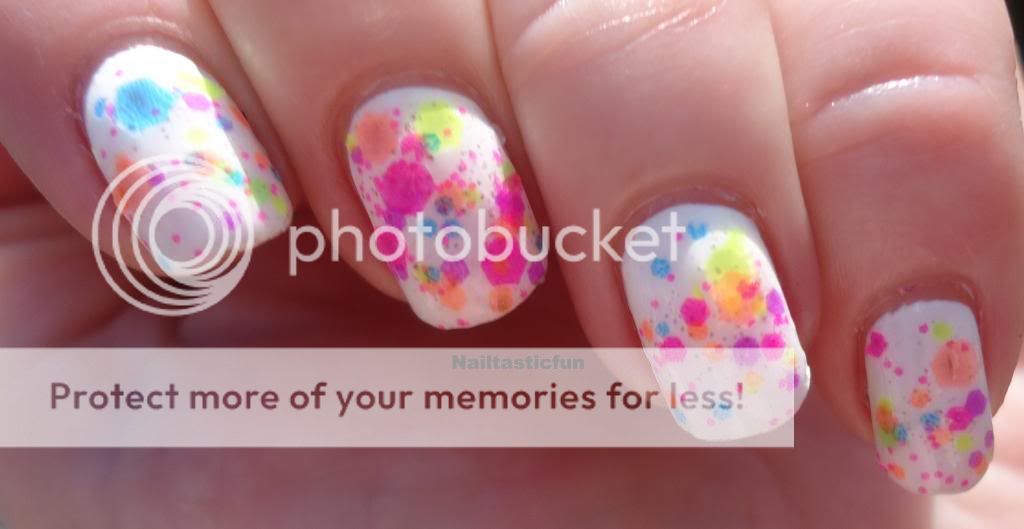
One way I get new polishes from time to time is by joining giveaways. There is always more than a few giveaways going on ( I even have a FB group devoted to just postings of nail and beauty related giveaways. It's a secret group though because we were getting way too many spam bots so if it is something you are interested in joining, ask me about it in the comments or you can find ways to contact me under the "contact me" section) Anyhow, obviously there is no guarantee that you will win any or what not but I do participate in as many as I can and I have actually won a few here and there. The great thing I have found is that when I win, the host or hostess are always more than nice and friendly. I actually did not win this giveaways main prize but I was one of the secondary winners (or maybe 3rd...4th) which is more than fine by me and I was lucky enough to have won a mini bottle of their gold top coat. I was so happy to have won this because I do not own ANY of the top coats out there. I almost had the Zoya one once but that was a huge drama infested swap that did not turn out that I just won't get into and OPI's "Man with the golden gun" was for sale out here in Canada only at my nail supply store for 35$+tax but I never did go for it.... Now, I see more and more brands coming out with some but still, as I said, did not have one but really wanted to try one so, winning this was just AWESOME! Plus it was a brand I had not yet tried so it was a win win. As always I say a little something about the polish but this is pretty self explanatory so let me guide you to the brand. As I said they are named "What the flock" (AWESOME right?!?!) and is a Dutch company, I believe. Here is a link to their website and here is their facebook page. In emails with me, they spoke English so I don't think communication is a huge problem. Anyhow as I said, the polish is your basic gold top coat in a clear base. Which, in case you don't know, is actually gold specks in a clear base that you apply to your nails, preferably over a dark color. Let's have a look at what I did with mine. I put it over OPI "incognito in Sausolito" which is a dark, navy creme, perfectly opaque in two coats. I actually have the whole San-Francisco line to swatch for you guys and this was one of my fav of the collection. I personally think that the gold top coat looks best over dark colors and I think this was a great choice. Let's get to the pictures and see if you agree?


                                                                       In Sunlight


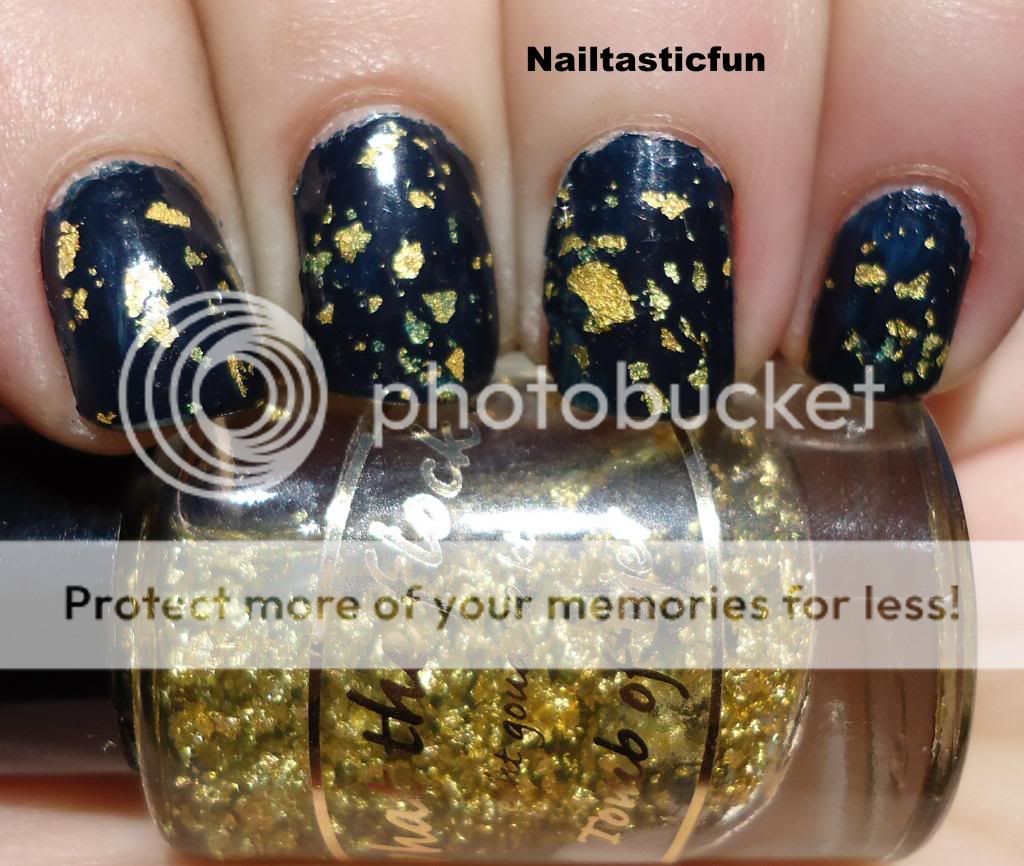
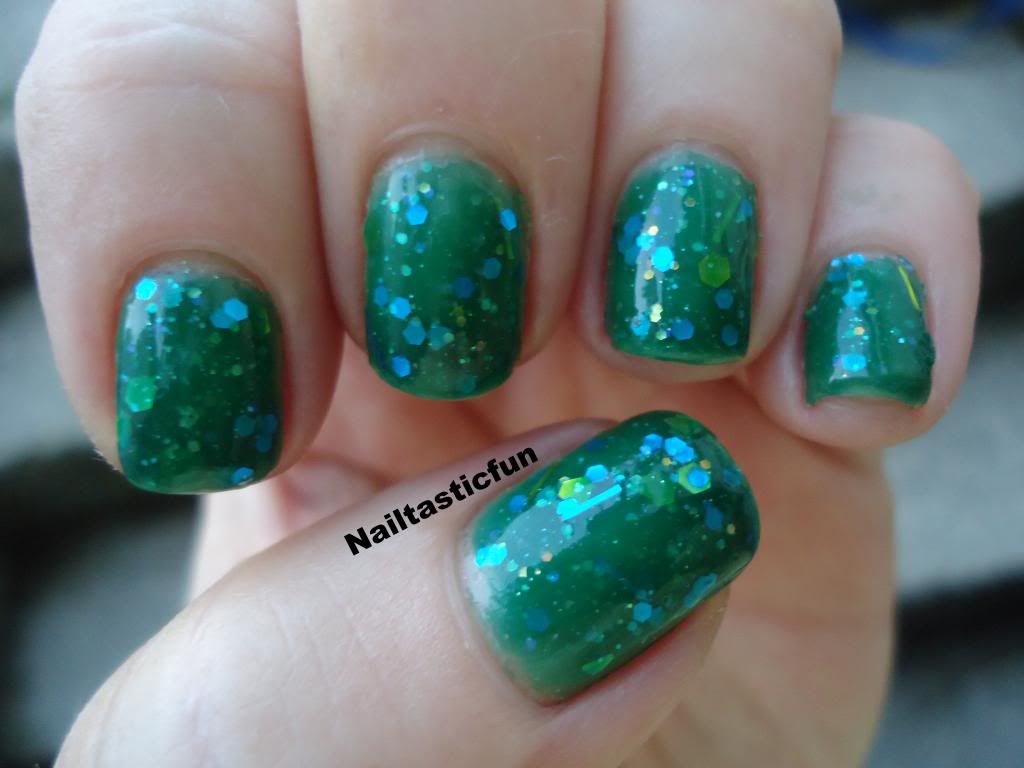
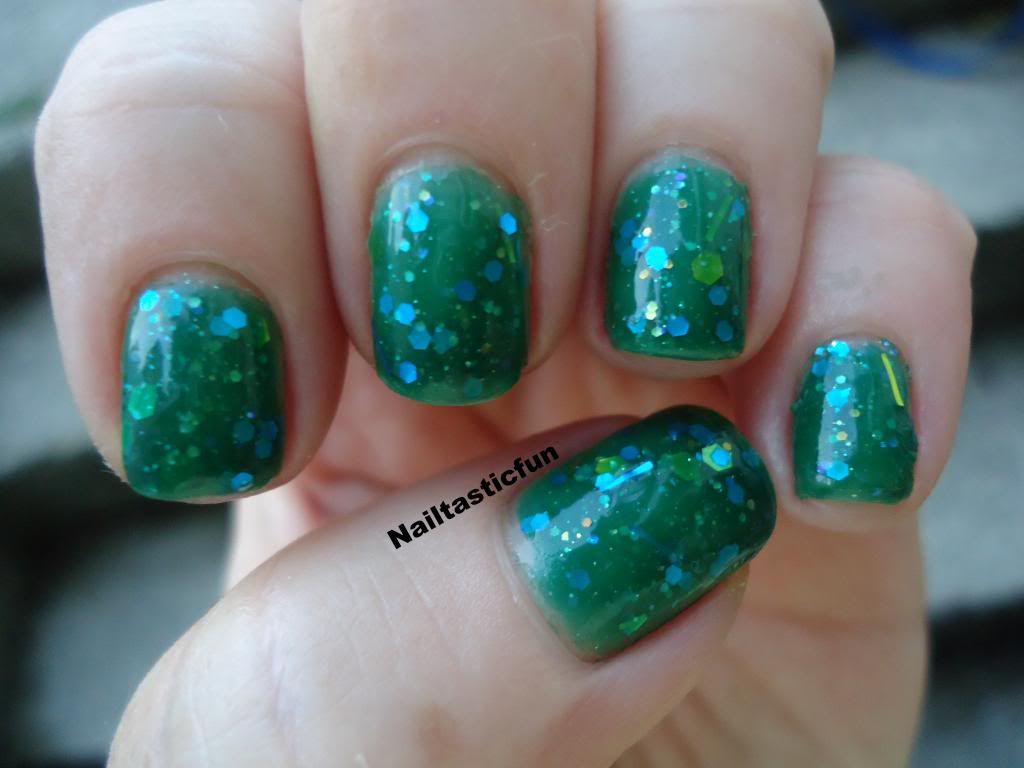
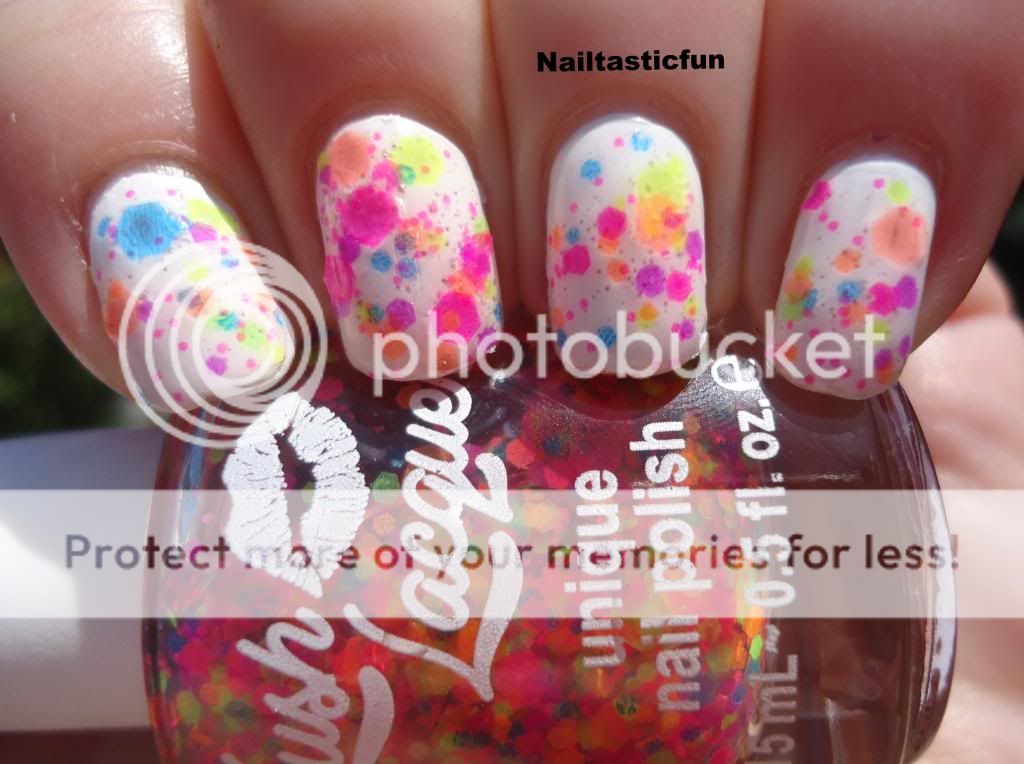
I did have a bit of trouble fishing the gold pieces here in there. I do believe it may have a lot to do with the fact that I had a mini bottle but it was a bit hard to get specks on my brush at times. If you look at the bottle you can see that there is no shortage of gold flecks. If I had gone and got a bigger brush (from any other bottle of normal sized polish) I bet it would have made it much easier.


You can see some spots, especially on my middle finger where over the top coat, you see some of the base color on top of it. That has to do with when I had a hard time fishing for pieces, I would get a lot of the clear base coat and it did make a bit of a heavy coat. Again, it looks and sounds much worse that it was.

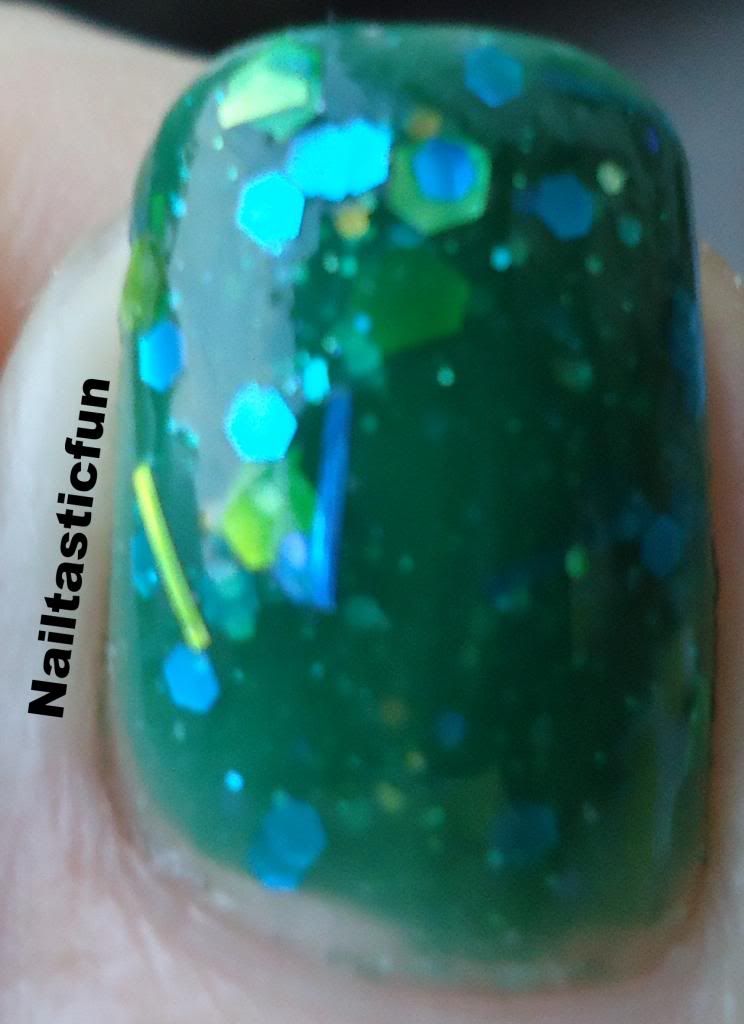
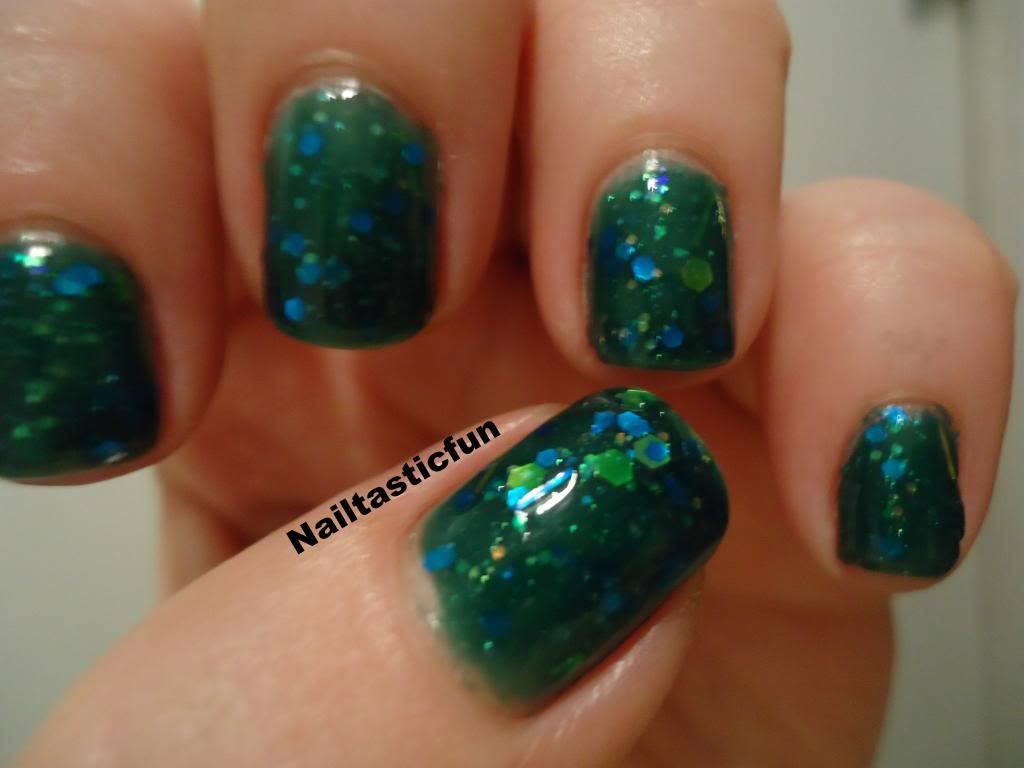
Here is a macro shot for you guys! I LOVE that big pieve right in the middle:)


So?? What do you guys thing of it? DO you like the look of gold flecks as a top coat? Personally, I think it's great. I really do love this look. And, as I did for my mani and as I said, I think it does look best over dark colors but, I have seen it over every color. For me, I just think it shows and contrasts more when the background is dark. Do you own any gold top coats? If so which ones? What color do you usually tend to wear it over?? What do you think of my mani? Love to hear from you guys so let me know what you think. Again, this bottle came form what the flock so you can go on over and have a look and get a bottle of your own and you can also check them out on their facebook page. Go show them your support from me if you can:) Hope you guys enjoyed this post. I am getting sleepy from my turkey dinner and as good as that pumpkin pie I am still saving sounds, think I will skip it for now and just go relax for a bit. That's it for now. Till next time, Keep on polishing them nails:) xxx


*Products in this post were awarded to me from a giveaway, however all opinions are my own. I was not given the bottle in return for my post abut them. In fact, I do not believe they even knew I had a blog or that I would be doing a post. 

Thursday 10 October 2013

Toxic and timeless by Pahlish


Hey guys!
so I have just a quick post for you guys tonight. I actually wasn't going to share it with you guys because I don't think the pictures came out that well. Meaning, they do NOT give this gorgeous polish any justice but I love it so much, I thought "WHAT THE HECK". You guys know I am not a pro so sometimes my pics won't be the best although I do try! Anyhow, this is a polish I saw awhile ago and fell in love with. I was lucky enough to get my hands on it and so glad I did. A bit about this polish...

Toxic and Timeless: It is a green jelly with large and small gold and blue hexes and bars . There's also a holographic nature to it. It's the PERFECT jelly sammich in a bottle. What I loved best about this polish was the application. I have had polishes like this before and they are a pain in the you know what when it comes to putting it on and a few I had to take off because it just did not look right. For my mani, I wore 3 thin coats and application was perfect. Went on so easily and looked GREAT!!! As always, I topped it with seche vite which is my go to top coat especially for anything with a lot of glitter but lately I have been getting those stupid air bubbles (see my post on " clowning around) on all my mani's and it is really starting to annoy me. I love what Seche Vite does! I love how smooth it makes your mani, the drying time and apart from the bubbles I really can't say anything bad about it but those bubbles are really starting to be a problem for me. If I am not using a glitter polish, I will use other top coats. For example if I am using an Essie, I will use my Essie top coat , which I use for most other cremes and such, or OPI top coat when wearing OPI's. But I think it is time I start looking for another heavy duty top coat....Any suggestions out there??
Anyhow, as I often do, I am getting off topic here..... Back to this gorgeous polish. As I said, this is three thin coats followed with a heavy coat of Seche vite. Lets get to the good stuff:):):):)


                                                        Toxic and timeless
                                           (in sunlight)


AAHH! Just look at the jelly goodness!!!

I LOVE how easily it layers so that it creates that wonderful jelly sammich look!

Yes, there is so VNL but it wasn't bad enough to bother me....


Indoors


So, even though, as I said, my pictures are not the best quality, they are still good enough for you to see how gorgeous this polish is. I LOVE LOVE LOVE it! I really do. Again, I love how easily I was able to apply it because, in the past I have had a hard time with glitter based jellies. I have also seen swatches with a color underneath and that looked cool also but I love the look of this on its own. Pahlish can be bought at online here. IF you go to Etsy you will find it but it's in vacation mode because she sells here. They are sold for 9$ a bottle US and she has a new fall collection out right now that is just GORGEOUS!!!!.  She is also on facebook, here So, what do you guys think of this one? Fan of jellies? Own any Pahlish polishes?? Love to hear from you guys:) Hope you enjoyed my post:)


*all polishes in this post were bought with money from my own pocket. Nothing was provided for review and all opinions are my own and not influenced. 

Sunday 6 October 2013

Guest post from Shannon "Leopard print nails tutorial"


Hey guys,
so I have been seriously lacking on posts lately. Been busy...blah blah blah, I know. Anyhow, I have a great treat for you guys today. A friend of mine is always posting pictures of her nails on Facebook and I , of course, always noticed them. And I must say she does really nice and amazing mani's. Here's a few from her facebook page...

Simple yet elegant mani with rhinestones:) 

I LOVE the look of this one! Just LOVE IT! Great mix of colors and especially love what she did with the black!

Look at that AWESOME water marble work! I think we need her to give us a tutorial on how she made her look so perfect!!!

Really great stuff eh?!?! Much better than I tend to do, although that is not hard to beat... Shannon is an old friend of mine from high school, she doesn't have a blog (yet...) but says nails are her passion and it shows. So, I asked her if she would like to do a guest post on my blog, just to dip her toes into the blogger world and I am thrilled to say that she agreed, after a bit of convincing:) So, she did a tutorial for me. A leopard print tutorial, which is one I need to follow! SO let's get right to it. All pictures are of Shannon's nails, taken herself and all instructions are her own:)
Let's get to the good stuff:) I leave you in the very capable hands and tips of Shannon from here:)


Leopard print mani tutorial


Hi everyone! okay... So this is my first time doing any sort of tutorials, so hopefully it won't be half bad and some of you will actually enjoy it! Lol. I decided to do leopard print nails today. I'm sure some of you think it looks a little hard but believe me it's actually very simple!

For the first step I applied a base coat to all of my nails before beginning to apply the Polish. As for the colors I used my Revlon Color Stay in Nude Beige, Sally Hansen Hard as Nails Black Out #370, as well I have my NYC Matte me Crazy, along with my Personnelle Nail Design pen in Black.


Once my base coat was dry I applied two coats of the Beige to my index, middle and ring finger, and two coats of the Black to my pinky and thumb. Once dried, I applied the Matte top coat to my pinky and thumb.


Now for the fun part! For this stuff I used my nail art pen. (Some people prefer a dotting tool or strippers, I just feel I have more control with the pen) I know I know it looks hard right? But its really not... All you have to do is create curved lines mix those up with dots and you're done! I personally prefer to make some bigger than others , but you don't have to. If you're not comfortable doing this directly on your nail polish you can practice on a paper if it's your first time. It should come out looking something like this...


Now that we can be sure that are our black matte nails are completely dry, we can go ahead with either a dotting tool or a fine brush and you're top coat! All I have to do now is dip your brush or dotter into the clear top coat and do the same pattern onto your thumb and pinky nails. I like to make mine a little bit bigger just so that we can see the matte nail polish underneath a little bit better.


Once we're done simply apply your top coat to whichever fingers are not mattified, in this case your index, middle and ring finger and you're DONE! But be careful... It might take some time for your nails to dry completely with all these different coats of polish that we have on here. I hope you enjoy your nails as much as I do mine!


And just to show you guys a great example of what Shannon means by "YOu get more control with a nail art pen" and I will DEFINITELY use one next time I try it again, for mine I used a dotting tool and had NO CONTROL whatsoever. This is a mani that was never posted to the blog because, well, you will see in the pictures how bad it looks. This is with no clean up because I took it off right away....

YEAH YEAH! No laughing! I told you it was a major fail on my end! :P


Unlike me, Shannon wasn't going for a neon, colorful print like I was. But if you wanted to, you could still follow her instructions very easily. I would just suggest that first, use your dotting tool and do colorful dots all over your nail and then use the nail art pen to draw around it. There are so many ways you can do a leopard print mani. I really like Shannon's and the way she kept it simple yet elegant and something you could definitely still wear to work! 

And there is the final product once again. She makes it seem so easy doesn't she? Well, it's not that hard.I think Shannon did a great job for her first tutorial! What do you guys think? Let me know and show Shannon some support for her first go at the blogging world:) I LOVE the final look and I love the mix of matte and creme polishes:) As I said , Shannon is not a nail blogger nor does she have any professional training. And I say that not to take anything away from her credentials but to actually add to it! All designs and mani's she comes up with all come from her mind and creativity. In fact, I believe she told me that, as I am sure a lot of you moms can relate, she usually gets to her nails when her son is in bed. That is when she gets some time to herself. So hope you guys enjoyed this post and share with me if any of you do try to do it yourself. Love to hear from all of you and promise to be back with some swatches soon:)


*All polishes used/shown in this post were purchased from said persons own pocket. Nothing was provided for review and all opinions are my own and those of my guest.

Monday 23 September 2013

Lush LAcquer "Clowning around"


Hey Hey,
So, it seems I have been starting my posts with this same message lately, but, sorry I haven't been around all that much..."who I am sorry to, well you! My one loyal reader!! LMAO!) My next post is a catch up of the Monday mani challenges but, I have something that I am so excited to share with you guys tonight!
First of all, if you know my blog even just somewhat well, you know how much I LOVE Lush Lacquer nail polishes!! They're one of my fav inide brands ever!!! And I can not say enough good about them and you may also know how excited I was and how badly I wanted some of their new neon polishes! WELL.....YUP! I got the one I wanted the most to share with you guys, "clowning around". This polish is just as fun as it's name.

Clowning around: as described on their site "♥ Clowning Around is FAB-U-LOUS!!!!!!! You all have been asking for NEON glitter polishes so here we go...... Clowning Around is a clear base polish with bright neon colors scattered throughout it! We use only hexes in different sizes in this beauty. We have neon pink, neon orange, neon yellow, neon green, neon blue and neon purple glitters throughout this color combination. This polish looks gorgeous over EVERY COLOR! I get a ton of compliments when I wear this combination! The larger pieces tend to sink to the bottom or attach to the sides of the bottle due to their weight, so please fish for them and shake your bottle up and down and side to side to grab these glitters after every few nails! All of these transparent glitters are very thin so they like to cause trouble for some of us and they come out like a breeze with most of us! Please be prepared to use the "dab and place method" with all of our new neon glitter polishes. Just remember to shake your bottle upside down in-between every few nails and these glitters will disperse throughout the bottle and attach to our new fantastic brush.This polish should have a base coat color and should have 2 to 3 coats application on top of your base color choice. It has a smooth finish after applying 2 coats of a top coat or gelous. Please apply a thick top coat to seal in the glitter and allow for a smooth finish! Happy Polishing!!! :0) 

So yea, I couldn't have described it better! It's a clear polish with a bunch of neon glitters which makes for a fun top coat for many colors! I have two different mani's to show you guys. I have only seen mainly swatches over white, so I did that as well but I also did it over a skittles of colors. I also found that, unlike the description, there was not much fishing needed. Considering the type of polish it is, fishing was very minimal. Let's get on to the pictures. I will start of with the skittles mani:)

Colors used for this mani are, from thumb to pinkie: Essie "Fiji", OPI "Gargantuan green grape", Essie "full steam ahead", Essie "in the cab-ana" Essie "The more the merrier".
Also, just FYI, the lil air bubbles you see in my mani have absolutely NOTHING to do with the polish itself. It is a result of me using "Seche vite" as my top coat. Not a result of "Clowning around". Same with the "dents' you can kind of see. This has happened with other mani's when I have used "SV" and I have not seen this in other swatches of "Clowning around"
                                                               Clowning around
                                                      (over colorful skittles, in sun)


I know those lil air bubble are distracting but in real life, you don't see them. It isn't at all like it seems on the picture.


I especially love it over "Fiji" (thumb) and "in the cab-ana" (ring finger)

Inside


Wanted to show a macro shot of it over my two fav colors:)


And I can see why a lot of people choose to put it over white. It is just gorgeous. SO here is my take of it over OPI "Alpine snow"

                                                                         In the sun

IT really does "POP" over white!!!


Just look at those neon colors!! UGH! I just love it! The mixture of bright neons, the shapes....


Some macro shots!!


And just cause I never do, here is my right hand....


Ok, so COME ON!!! gorgeous, right??? And I don 't mean my nails, sounding all "OH MY! LOOK at my nails" This polish is just so awesome it will look great on any nails!!! I have often wanted a polish SO BADLY, as was the case with this one and then, once I get it, have it not live up to expectations. This one was beyond what I expected! I can not express my love for it enough and the proof, for me is the fact that not only did I wear the polish twice, so close together (I own a lot of polish, so most, get used once, some I use regularly for certain base colors , perfect example, the OPI "Alpine snow" is my go to white, but for the most part I use a polish once and some get used again but there will be a long break in between and I have so many polishes that I have yet to use, for the most part I have not gotten back around to using most , for a second time, yet), but I only had one different mani in between, speaks volumes! And I am already looking forward to wearing it again! As a full mani or I know I will be reaching for it quite often, even just for an accent nail. I think this is a must for every polish collection. If you don't own any indies, this is one I believe you need! 
I have a little something I feel I must add here. I got this bottle and another I was really excited to own, "Blue gypsy". I did wear it, however, I had a few issues with it. It was really thick and the final result just did not look right to me. So, I contacted Lush lacquer on their facebook page and got a response right away. Now, I am not going to start any thing or name any names, but I have had a few problems with indie polishes in the past and did the same thing. Contacted them and, I won't be rude or anything but just state what my problem is. For the most part, I get a response, stating so and so, or asking for pictures (absolutely understandable) but I have gotten my share of rude responses and no response at all (after numerous attempts to contact). Anyhow, point I am getting at and yes, there is one, is I contacted them and explained my situation, as I already said and the response I got was beyond helpful, friendly and above all respectful and more than willing to help. I was actually even given a phone number to call to talk about the situation in more detail and when I didn't call (because, I am the worlds worst procrastinator)  I got a second response, just as nice as the first one saying for me to call and suggesting what I should do to fix my problem. There is no excuse and it's all on me, but I still didn't call. I am in Canada, so calling long distance isn't cheap. I have to wait till after 6 p.m. my time, and then I am not sure how late it is for her....But that is not the reason at all. It is all on me just being busy and procrastinating  But I felt the need to share this with you guys. It's one thing that I find goes either way with indie polishes. I either get a great response/interaction with the maker or it's the total opposite. I find, not to sound conceded or anything, but we are the ones who are buying their polishes and supporting them so the very least they can do is answer us back. And I don't mean they have to be as friendly as Lush Lacquer was. Just a response is expected. And I get some are busy and probably get A LOT so, I know it doesn't mean I will get one right away but when you're ignored or get a rude response, for me, it just leaves a bad taste in my mouth. ANYHOW, here I go again, just going on and on and on.... The point I am trying to make is that Lush Lacquer was not only nice to me they went above and beyond to accommodate me and did not by any means make me feel bad or stupid for asking what I did. So, A+ for them on the customer service front and, of course, you know I say A ++++ for their polishes!!! OMG!! HAVE YOU SEEN THEIR NEW HALLOWEEN COLLECTION?!?!?! UGH! Just when I finally get my hands on some neons (oh and they released more neons also! Just as gorgeous as this one!) they release more goodies!! I can not suggest to you all enough that you should absolutely go have a look for yourself! Here again is their facebook page and here is their etsy page. And trust me, I know for some of us, indie polishes are expensive. I am not one who can afford to go and buy all the new collections out there. I WISH!! I was one who used to think "WHAT?? Why would I pay x amount for polish from someone I don't even know??" but I have grown to not only love, but appreciate indie polishes. And not all are, but you find the right ones and you know that it is made from a fellow polish lover like yourself who just loves what they are doing and it shows in their work. So, some can be pricey but I do believe everyone deserves a few in their stash. If I want, no make that NEED some bad enough, I won't buy polish for, say a month, from stores, and then the money I didn't spend, I can use that to buy some:) If you have yet to purchase an indie, I say go for it, give it a try and lush lacquer is a perfect place to start. But if you get addicted, don't come yelling at me!!! I don't have anyone to yell at for my addiction!! LOL. Anyhow, I have written way more than usual here but I really wanted to share that.
ANYWAYS, what do you guys think of this polish? Own any Lush lacquer polishes?? If so which ones?? Love to hear from all of you:)

Till next time..............

*All polishes used in this post were purchased with money from my own pocket. All opinions are my own and none are influenced in any way.